Documentation Generation

| Organisation: | Copyright (C) 2022-2026 Olivier Boudeville |
|---|---|
| Contact: | about (dash) howtos (at) esperide (dot) com |
| Creation date: | Wednesday, January 12, 2022 |
| Lastly updated: | Wednesday, July 1, 2026 |
- Objective
- Our Preferred Lightweight Approach
- Our Preferred More Heavy-Duty Approach
- Miscellaneous
- Validating / Checking HTML Content
- Solving Lacking *.sty files
- Fixing Permissions in Third-Party Content to Integrate in a Web Root
- Pointing to a Specific Moment in a Linked Video
- Conversion between Markup Formats
- Transformation of PDF files
- Image Transformations
- Plot Generation
- UML Diagrams
- Finding Usable Content
- Using Additional Fonts
- Language-specific Conventions
Objective
The goal is to generate nice documentations of any kind (not necessarily technical), as static content - as opposed to wikis or content management systems (CMS).
We want to be able to generate, from a single source, at least two documentation formats:
- a set of interlinked static web pages (the most popular, flexible format)
- a single, standalone PDF file (convenient for offline reading, printing, etc.)
The document source shall be expressed in a simple, non-limiting, high-level syntax; in practice a rather standard, lightweight markup language.
All standard documentation elements shall be available (e.g. title, tables, images, links, references, tables of content, etc.) and be customisable.
The resulting documents shall be quickly and easily generated, with proper error report, and be beautiful and user-friendly (e.g. with well-configured LaTeX, with appropriate CSS, icons and features like banners, with proper rendering of equations).
Per-format overriding shall be possible (e.g. to define different image sizes depending on web output or PDF one).
The whole documentation process shall be powered only by free software solutions, easily automated (e.g. with Make) and suitable for version control (e.g. with Git).
For that we rely on two possible approaches, a lighter one and a more involved one, depending on the project at hand.
Our Preferred Lightweight Approach
Principle
We found this approach convenient for lighter projects, i.e. ones comprising a limited number of pages. This is the case of this page and more generally of the whole Ceylan-HOWTO website.
We chose to rely on the reStructuredText syntax and tools, also known as RST, a part of the Docutils project. Here we do not specifically rely on elements related to Python or the Sphinx toolchain, as our more heavy-duty approach does.
We augmented reStructuredText with:
- a set of make-based defines and rules (automatic or explicit) that were aggregated in Ceylan-Myriad (see notably GNUmakerules-docutils.inc and the generate-docutils.sh generation script); this mechanism is layer-friendly, in the sense that all layers defined (directly or not) on top of Myriad are able by default to re-use these elements and to customise them if needed
- a template on which we rely for most documents, featuring notably a standard table (to specify usual metadata such as organisation, contact information, abstract, versions, etc.), a table of contents, conventions in terms of title hierarchy and, for the HTML output, a banner (a fixed, non-scrolling panel offering shortcuts, in the top-right corner of the page)
- a simple tag-based system to have the actual document markup (*.rst) directly generated from a higher-level source one (*.rst.template); in practice, if defined, only the latter element is edited by the user, and tags (such as *_VERSION_TAG, *_DATE_TAG, etc.) are automatically filled-in appropriately
Of course this website, and many others that we created, rely on this approach; as an example, one may look at the sources of the current document.
Specific Topics
Rendering Mathematical Elements
With the RST toolchain, the PDF output, thanks to LaTeX, offers built-in high-quality rendering of mathematical elements such as equations, matrices, etc.
By default, the HTML output does not benefit from LaTeX, and remains significantly less pleasing to the eye, and less readable.
So we complement it by MathJax, a neat open-source "JavaScript display engine for mathematics that works in all browsers".
It shall thus be installed once for all first.
Basic, Less-than-Satisfactory, Installation Approach
For example, on Arch Linux, as root, it is sufficient to execute:
$ pacman -Sy mathjax
If not having root permissions, it can be installed directly in one's user account, for example:
$ cd /tmp && git clone https://github.com/mathjax/MathJax.git
$ mv MathJax/es5 ~/Software/MathJax
Then, to enable the use of MathJax for a given website based on Ceylan-Myriad, run from its root (often a doc directory):
$ make create-mathjax-symlink
(this target is defined in GNUmakerules-docutils.inc; it boils down to symlinking /usr/share/mathjax; see also the HOWTOs corresponding makefile to properly manage this dependency afterwards, notably when deploying web content)
Yet, depending on settings and conventions, updating MathJax in a web root may lead to permission errors; in that case the next approach shall be favored.
Better, Webroot-compliant Installation Approach
Just install MathJax directly in your user account (e.g. in ~/Software/mathjax), follow the guidelines in the Fixing Permissions in Third-Party Content to Integrate in a Web Root section, and add symlinks to the result in all documentation trees requiring MathJax.
For that, rather than installing MathJax by oneself (as we found its website rather unclear about how to install it when not in a Node.JS context) or possibly taking inspiration from this PKGBUILD, the simplest way is to install it from one's package manager (e.g. pacman -Sy mathjax) and to copy the result in one's account: cp -r /usr/share/mathjax ~/Software/, before fixing permissions there. This local copy shall just be regularly updated.
If Needing to Generate Images from Formulas
This is typically generating an image file file from a LaTeX formula to include in a presentation, an e-mail, any kind of post, etc.
LaTeX to SVG
tex2svg is the tool of choice here.
On Arch Linux, the texlive-bin (for pdflatex) and pdf2svg packages may have to be installed.
LaTeX to PNG
We do not think this is the best approach as the resulting bitmap file is likely to have issues in terms of rendering/aliasing.
This can be done thanks to tex2png, a simple yet effective Bash script.
At least the texlive-fontsrecommended Arch package shall be installed beforehand, so that the lmodern.sty file is available.
Example of use: ./tex2png -c "$\phi_n(\kappa) = \frac{1}{4\pi^2\kappa^2}$" -T -D 500 -o my-example.png.
Usage
The list of TeX/LaTeX commands supported by MathJax may be of use.
Each LaTeX command may either be specified directly inline, in the text (with :math:`LATEX_CMD`) or in a block indented after a .. math:: directive.
This allows to define inline mathematical elements, like \(P = \begin{pmatrix} 10 \\ 45\end{pmatrix}\) (obtained with P = \\begin{pmatrix} 10 \\\\ 45\\end{pmatrix}) or standalone ones, like:
obtained thanks to:
M = \begin{bmatrix}
       a11 & a12 & ... & a1n \\
       a21 & a22 & ... & a2n \\
       ... & ... & ... & ... \\
       am1 & am2 & ... & amn \\
    \end{bmatrix}
For \(\phi: \mathbb{R} \rightarrow ]0,1[\) (i.e. \phi: \mathbb{R} \rightarrow ]0,1[), we may have \(P_e = \phi(m+\phi^{-1}(P_n))\) is P_e = \phi(m+\phi^{-1}(P_n)).
If \(\phi(x) = e^{x}/(1+e^{x})\) (translating to \phi(x) = e^{x}/(1+e^{x})), then:
(translating to P_e = \frac{P_n.e^{m}}{1 + P_n.(e^{m}-1)})
A few other examples of resulting math-related outputs can be seen in this section.
See the next section for a proper use of MathJax in webservers.
Other LaTeX elements that may be convenient:
- multiplying: use A \times B for \(A \times B\), and A \cdot B for \(A \cdot B\)
- Greek letters: use \alpha for \(\alpha\) (lowercase), and \Gamma for \(\Gamma\) (uppercase)
- figures, like with:
.. figure:: static/xx.png
    :align: center

    Some relevant caption.
Title Hierarchy
It must be consistent: a given type of subtitle must always be placed at the same level in the title hierarchy.
We rely on the markup conventions exposed in this demonstration file (created by David Goodger), whose source is here.
From the top-level title to the most nested ones:
- =, on top and below the title (document title)
- -, on top and below the title (document subtitle)
- =, below the title (H1)
- -, below the title (H2)
- . , below the title (H3)
- _, below the title (H4)
- *, below the title (H5)
- :, below the title (H6)
- +, below the title (H7)
Image Sizes
Responsive images, i.e. images that automatically adjust to fit the size of the screen, can be used. They are then defined for example thanks to:
<img src="foobar.png" id="responsive-image-large"></img>
Various standard sizes have been defined, all prefixed with responsive-image-; from the biggest (95%) to the smallest (10%), as defined for example in myriad.css, they are: full, large, intermediate, medium, reduced, small, tiny, xsmall.
Multi-File Documents
Targeting a Standalone Document
Although they tend to be less convenient to edit, longer documents may be split in a set of RST source files (the Myriad documentation is an example of it; the WOOPER documentation is an example of the opposite approach, based on a single source file).
Targeting Interlinked Modular Documents
In some cases, at least for the HTML output, the need is not to produce a single, large, monolithic document, but a set of interlinked ones (the present HOWTO is an example thereof) that can be browsed as separate pages.
Then a convenient approach is to define different entry points for different output formats, like, for these HOWTOs, this one for the HTML output and this one for the PDF output.
Inner Links
Defining any title (e.g. the "Rendering Mathematical Elements" one above) automatically introduces in turn a corresponding anchor, which, for the HTML output, can then be referenced from any page, for example as raw HTML (like MyPage.html#rendering-mathematical-elements, or directly from the current page as #rendering-mathematical-elements) or directly through RST in the document (e.g. specified as `Rendering Mathematical Elements`_, resulting in: Rendering Mathematical Elements).
Note the light "slug-like" transformation (e.g. spaces becoming dashes) of the specified name once it is translated into a legit HTML anchor.
Extra local anchors (e.g. that could be named "how to render equations") can also be specified anywhere in the document (e.g. just before the previously mentioned title, so that it can be designated with other words), thanks to:
.. _`how to render equations`:
It can then be referenced from the same page as #how-to-render-equations or from another one as MyPage.html#how-to-render-equations.
Note that titles and hypertext links introduce local links as well, so one's inner links may clash with them (resulting in (ERROR/3) Duplicate target name [...]); one option is to phrase these inner links differently, another (better) one is to prevent the creation of a local link by this hypertext reference, by suffixing it with two underscores instead of one:
.. `Foo <http://foo.org>`__
instead of the usual link-creating:
.. `Foo <http://foo.org>`_
Citations & References
Choice of Conventions
Engineering generally relies often on the IEEE or the APA citation style.
We dislike a bit IEEE, as its references are just numbers (e.g. [1] in Lindberg and Lee [1]), instead of more informative elements (like [CIT2002]), so we chose APA, which seems more in-line with RST conventions.
Within APA, we prefer parenthetical citations (e.g. (Salas & D’Agostino, 2020)) to narrative ones (e.g. Salas and D’Agostino (2020)).
Here are extra examples thereof:
the in-text reference pointers shall be, for books, like (Author, Year); for example (Taylor, 2005)
each of these pointers designates an actual reference in the form:
Authors' Last name, First Initial. (Year). Book title: Subtitle. (Edition) [if other than the 1st]. Publisher
Unfortunately neither types of APA citations is supported (possibly because of the parentheses and/or the space, the text is not interpreted as a citation. So for example [(Taylor, 2005)]_ / .. [(Taylor, 2005)] will not work.
So we finally retained conventions that are a bit different: APA with no parentheses or space.
Example
Finally an actual example just follows: like explained in [Taylor2005], the conservation of momentum can help solving elegantly some problems.
| [Taylor2005] | Taylor, J, (2005), Classical Mechanics, (2005), University Science Book, 98-100 |
Commenting
To comment-out a block of text, just add .. at the beginning of a line, then, from the next line, put that block, indented of at least one space; this must be a legit block (see Defining Blocks).
Defining Blocks
All lines of a block shall start with the same whitespace. So, whenever a given block is not left-justified (meaning that at least one of its lines starts with a different offset), prefer having all lines of such a block be indented of (at least) 4 spaces (i.e. a tabulation).
Otherwise, if using a single space to indent, as soon as a line of the block is to start with 3 spaces, whitespace-cleanup operations will combine them with the first one to form a tabulation (4 spaces in a row), and all lines of the commented block will not start with the same whitespaces, which could result, from the point of view of RST tools, in an invalid block.
To indent on Emacs, one may select the region of interest and then hit C-x TAB TAB TAB [...] (or even just TAB once the block is selected).
Either a standard or a code indented block may be used.
A standard block is introduced by a non-indented text finishing with two colons (::), like in: Here is what she said::.
Note
Unfortunately this does not allow proper French syntax, for which a space is needed before the colons (e.g. typed as Elle a dit ensuite ::): adding such a space will result in no colon to be displayed.
So we stick to writing an improper Elle a dit ensuite::, which is rendered as Elle a dit ensuite:, better than Elle a dit ensuite but worse than Elle a dit ensuite :.
Before a code block (e.g. introduced with .. code:: erlang), a single colon should be used, not two of them. For example:
This algorithm can be:

.. code:: erlang
   [...]
Fixing WARNING: Duplicate explicit target name: "some link"
This typically happens whenever defining a link with a given label more than once.
A solution is to use anonymous reference instead, i.e. double underscores (so: __) to define references, like in:
Here is `some link <http://example.org/xxx>`__.
Using double underscores for links could be considered the norm.
Our Preferred More Heavy-Duty Approach
Principle
It applies to more ambitious projects, involving larger content with potentially many interlinked pages.
It is based on the Sphinx toolchain, and therefore shares many elements with our lightweight approach above, starting from the RST syntax.
It offers out of the box many useful mechanisms beyond the generation of a single-page website, from a smooth navigation between a set of pages based on foldable menus to a generated index and a local search engine. It moreover can be easily customised.
More types of outputs are readily supported: HTML, PDF, EPUB, man pages.
Installation
One may follow these guidelines. On Arch Linux, we install the python-sphinx package, thanks to: pacman -Sy python-sphinx gnu-free-fonts texlive-binextra (last package being needed now for latexmk, to generate PDFs).
Configuration
Running sphinx-quickstart is one's best route; in terms of choices:
- we strongly recommend separating the source and build directories
- the "Project name" shall not include "documentation", as this word will be added automatically wherever needed
Then make html should generate a base website (including makefiles) that can be browsed in the build/html directory (use make clean to force its erasure; run just make to list all targets of interest, including the linkcheck one, to check all external links for integrity).
The project settings can be edited in source/conf.py.
Theme Selection
The default (HTML) theme is the Alabaster one. Other themes may be preferred, whether they are Sphinx built-ins or external ones. Many can be customised.
As for us, we prefer mobile-compliant themes with a left column to navigate. This includes the popular Read the Docs theme, which will use here, but also the classic theme.
The documentation of the Read the Docs theme details everything needed. For an installation thereof on Arch, the simplest is to run pacman -Sy python-sphinx_rtd_theme.
Then it is just a matter of editing source/conf.py so that 'sphinx_rtd_theme' is listed in the extensions list, and that the html_theme is now set to 'sphinx_rtd_theme'.
Running make html again should be sufficient to take this new theme into account. The generated result is quite satisfying.
Here is one customisation thereof (theme options) that we like:
#html_theme = 'alabaster'
html_theme = 'sphinx_rtd_theme'

html_theme_options = {
   #'analytics_id': 'G-XXXXXXXXXX',  #  Provided by Google in your dashboard
   #'analytics_anonymize_ip': True,
   'logo_only': False,
   'display_version': True,
   'prev_next_buttons_location': 'both',
   'style_external_links': True,
   'vcs_pageview_mode': '',
   #'style_nav_header_background': 'white',
   #'style_nav_header_background': '#2980B9',
   'style_nav_header_background': 'black',
   # Toc options
   'collapse_navigation': False,
   'sticky_navigation': True,
   'navigation_depth': 4,
   'includehidden': True,
   'titles_only': False
}

html_logo = '../foobar-title.png'
html_favicon =  '../foobar-icon.png'
html_last_updated_fmt = ''
html_copy_source = False
html_show_sourcelink = False
html_show_sphinx = False

html_static_path = ['_static']

# So that inner cross-RST file references can be found:
default_role = 'any'
Theme Customisation
Our opinion is that the themes, notably the Alabaster one, are mostly good, except regarding (at least with Alabaster) the vertical spacing between paragraphs, which is too large - especially between a sentence (which ends up in a paragraph of its own) that introduces a list and the first item of that list, like:
The various colors are:

- blue
- green
Indeed, with the Alabaster theme (thus unrelated to the rendering in the current page), in our opinion blue should be displayed closer to the previous line.
For the sake of testing, replacing <p>The various [...] with <p style="margin: 0px">The various [...] yields a far better result.
However the built-in theme.css is not designed to be directly edited (e.g. it is CSS-minified); so instead we defined source/static/esperide-custom.css roughly as:
@import 'theme.css';

h3 {
   margin-top: 4%;
   /* No effect unfortunately: */
    margin-bottom: -10px;
}

p {
   margin-top: 5px;
   margin-bottom: 2px;
}

ul {
   margin-top: 0px;
}
We then referenced it in source/conf.py simply with html_css_files = ["esperide-custom.css"] (knowing that there was already html_static_path = ['static']).
The result is sufficiently better in our opinion.
Adding Content
This is just a matter of adding *.rst files (each defining at least one title) in the source directory, and to reference them in a least one table of contents (e.g. in source/index.rst), like in:
.. toctree::
  :maxdepth: 2
  :caption: Contents:

  ./foobar.rst
  ./buz.rst
The result in a static website that can safely be transferred and served by any webserver of choice.
Inner Links with Sphinx
We recommend allowing referencing sections based on their title (each title becoming a possible link target). This is done by adding, among the extensions, the 'sphinx.ext.autosectionlabel' one. Adding in turn, among the suppress_warnings, the 'autosectionlabel.*' one is then useful to silence messages like WARNING: duplicate label foo, other instance in bar.rst.
Then, in our preferred approach for inner links, described here and there, such links - which are possibly defined and referenced in different RST files - are to be managed in a slightly different way than for Docutils's inner links.
Indeed, in order to be able to reference:
- label sections (i.e. titles in the document):
- first, as shown in the conf.py example above, the default_role = 'any' setting may be specified (this means that if no role is specified, then the most flexible any one is assumed; for example writing just `hello` would translate to :any:`goodbye` (rather than for example :ref:`hello`)
- then, each inner link target (e.g. a Brief Answers title) shall be referenced (preserving or not the upper/lower case of this title) like with Docutils but without a trailing underscore, e.g. as `brief answers` (rather than as `brief answers`_); optionally (this is what we recommend, for clarity and to emphasize this is Sphinx syntax, and not the Docutils one), such references may be prefixed with :ref:, like in: :ref:`brief answers`; if wanting to have a specific text displayed for regarding this reference, just use for example `my text <brief answers>` (or :ref:`my text <brief answers>`) - and of course do not define any specific my text anchor
- custom anchors (see also this link) pointing to (i.e. followed by) an element that is neither a title or a caption (otherwise, if using the autosectionlabel extension and defining a custom anchor before a title, a WARNING: duplicate label this is my anchor will be issued):
- such an anchor must be defined with: .. _this is my anchor: or, more classically, as .. _`this is my anchor`:; as mentioned, it will actually point to any next element of any class
- then, like for label sections, it can be referenced as: `this is the text of the link <this is my anchor>`; optionally (still recommended by us), such links may be prefixed with :ref:, like in: :ref:`this is the text of the link <this is my anchor>` (using just :ref:`this is my anchor`, i.e. not indicating a specific text for the anchor link, is not supported)
The Problem of Nested Includes
We would have liked to organise a Sphinx document according to a filesystem tree, so that there is in each directory a RST file that comprises the content for that level and that just lists its direct local children as the RST files in its subdirectories, as relative files, like, in a a/b/c/c.rst file: .. include:: d/d.rst.
Strangely enough, it worked for 3-level nesting (a, a/b and a/b/c), but not for the next level: even though the RST files in c where included as d/d.rst, they were never found:
a/b/c/c.rst:4: CRITICAL: Problems with "include" directive path:
InputError: [Errno 2] No such file or directory: 'a/b/d/d.rst'.
(we can see that c is lacking; no way of adding it once; and trying there to specify .. include:: c/d/d.rst results in a/b/c/c/d/d.rst not being found...)
The only (unsatisfactory) solution we found it is specify paths that are "absolute" (i.e. relative to the root of the tree), for example as .. include:: /a/b/c/d/d.rst.
Miscellaneous
These hints apply more generically than only with a RST toolchain.
Validating / Checking HTML Content
In addition to the verification of the messages reported when the document is built, some tools allow to perform some checks on a generated document.
Notably an online HTML page, or set of pages, can be verified by third-party tools like this one, to detect dead links.
Solving Lacking *.sty files
When an infamous issue like ! LaTeX Error: File `soul.sty' not found. is raised, it is the sign that the installed texlive group is not sufficient.
The solution is to find the relevant package in charge of this missing file, and to install it, like in:
$ pacman -F soul.sty
extra/texlive-plaingeneric 2023.66594-19 (texlive)
  usr/share/texmf-dist/tex/generic/soul/soul.sty

$ pacman -S texlive-plaingeneric
Fixing Permissions in Third-Party Content to Integrate in a Web Root
The objective is to ensure that a filesystem tree can be transferred as a whole without permission errors to a given server more than once, whereas the destination user and group (typically specialised and restricted on a server) differ from the source ones.
It is indeed often necessary to fix permissions in a third-party tree before it is transferred to a server (e.g. MathJax being copied from a client host through scp in a web root on a given server); otherwise the next transfers will stumble on the initial, inadequate group rights, typically preventing them to be overwritten by a process belonging to a different user yet being in the same group, like 700 instead of 770 - resulting in Permission denied errors.
For that we recommend executing our fix-www-metadata.sh script in the source root prior to transfer it to a webroot of choice. This typically applies to MathJax (see the Rendering Mathematical Elements section), which therefore should not be installed in the system tree thanks to a package manager (as our script will alter its permissions) but in the user account (e.g. as ~/Software/mathjax).
So typically this script shall be symlinked in each third-party root of interest, and be executed there at each update thereof.
However doing so does not solve all issues: the file entries created/updated by scp on the server will be owned by the user on the server implied by the scp command, for example stallone:users - not the desired web-srv-user:web-srv-group. Of course the fix-www-metadata.sh script can be run (by root) on the server to correct that. Yet the next update of this webroot will fail again with Permission denied errors, as the groups are not expected to match anymore (we cannot overwrite with our client-side users group a remote directory whose permission is 770 that is owned by group web-srv-group).
A solution is to ensure that the source content bears already the target group. As scp relies on user/group IDs, not on names (e.g. on a numerical GID like 1001, not a name like users or web-srv-group), the simplest solution is to determine the actual GID of the target group on the server (e.g. running, as root, grep web-srv-group /etc/group may tell us that the GID of web-srv-group is 1002 there) and to create on the client a group with the same GID (if ever possible - that is if there is not already another group happening to have be set to that GID) and to apply it to the source content to transfer, like in:
# We are on the "client", source host, as root:
# (web-srv-group-of-target-server clearer than web-srv-group)
$ groupadd --gid 1002 web-srv-group-of-target-server
$ usermod -a -G web-srv-group-of-target-server stallone
$ chgrp -R web-srv-group-of-target-server /home/stallone/mathjax
Then, afterwards, when the stallone user performs his scp repeatedly to transfer updated versions of his mathjax directory from the client to the server, he should be able to perform a flawless update of its files and directories.
Pointing to a Specific Moment in a Linked Video
It is as simple as designating, in an HTML link, the targeted second by suffixing the URL video filename with #t=DURATION_IN_SECONDS, like in some-video.mp4#t=1473 [1].
| [1] | With mplayer, use the o hotkey to display elapsed durations. |
Conversion between Markup Formats
Pandoc is the tool of choice for such operations, as it often yields good results.
For example, in order to convert a page written in Mediawiki syntax, whose source content has been pasted in a old-content-in-mediawiki.txt file, into one that be specified in a GitLab wiki (hence in GFM markup, for Github Flavored Markdown) from a converted content, to be written in a converted-content.gfm file, one may use:
$ pandoc old-content-in-mediawiki.txt --from=mediawiki --to=gfm --standalone -o converted-content.gfm

# Or, for older versions of pandoc not supporting a gfm writer:
$ pandoc old-content-in-mediawiki.txt --from=mediawiki --to=gfm --standalone -o converted-content.gfm
Then the content in converted-content.gfm file can be pasted in the target GitLab wiki page.
Another example is the conversion of a GitLab wiki page into a RST document (e.g. then for a PDF generation):
$ pandoc my-gitlab-wiki-extract.gfm --from=gfm --to=rst --standalone -o my-converted-content.rst

# Or, for older versions of pandoc not supporting a gfm reader:
$ pandoc my-gitlab-wiki-extract.gfm --from=gfm --to=rst --standalone -o my-converted-content.rst
Finally, if really needing to generate a Word document, an example from a RST document may be:
$ pandoc my-document.rst --from=rst --to=docx -o my-converted-document.docx
Whereas this would be, from a GFM document (typically a GitLab/Github page):
$ pandoc test.txt --from=gfm --to=docx -o test.docx
Of course then various improvements could be made on the resulting Word document: a table of contents and line breaks could be added, images could be restored, etc.
The lists of the input and output formats supported by Pandoc and of their corresponding command-line options is specified here.
These options are also returned by: pandoc --list-input-formats and pandoc --list-output-formats (or, for older versions of pandoc, thanks to pandoc --help).
An input file may not be encoded in UTF-8, which can result in:
pandoc: Cannot decode byte '\xe9': Data.Text.Internal.Encoding.Fusion.streamUtf8: Invalid UTF-8 stream
In this case, the actual encoding shall be determined, for example with:
$ file input.html
input.html: HTML document, ISO-8859 text
Then the encoding may be changed before calling pandoc, for example like:
$ iconv -f ISO-8859-1 -t utf-8 input.html | pandoc --from=html --to=gfm --standalone -o output.gfm
Transformation of PDF files
For that, one may use the pdftk tool, possibly with the convert one, which comes from ImageMagick (typically available thanks to a imagemagick package):
- to split all pages of a PDF in as many individual files (named pg_0001.pdf, pg_0002.pdf, etc.): pdftk document.pdf burst
- to extract a range of pages from a PDF: pdftk original-document.pdf cat 276-313 output my-extract.pdf
- to convert a PDF file (typically a single page) into a PNG one (typically in order to edit the PNG with The Gimp afterwards): convert pg_000x.pdf pg_000x.png
- to convert (possibly back) a PNG file to a PDF one: convert pg_000x-modified.png pg_000x-modified.pdf
- to concatenate PDFs: pdftk 1.pdf 2.pdf 3.pdf cat output 123.pdf
PDF documents may contain images/scans (possibly of texts) and/or actual, raw texts. If a PDF is a scan, OCR (Optical character recognition) can be used in order to convert the embedded scans into their actual text. Such a transformation can be done online, and we found PDF24 very useful for that. From such services, usually a PDF (thus including text instead of images) is generated. To obtain a text version thereof respecting its layout (typically to preserve the indentation of a scanned program), one may use: pdftotext -layout my-OCRed-document.pdf in order to enjoy a proper my-OCRed-document.txt.
Image Transformations
One may rely on:
- GIMP (GNU Image Manipulation Program; corresponding, on Arch, to the gimp package), for bitmap (e.g. PNG) graphics
- Inkscape, for vector-based (e.g. SVG) graphics
- or on command-line ImageMagick (on Arch Linux, install the imagemagick package, which provides notably the convert and display executables)
Inverting an Image
To invert/negate an image (swap colors with their complementary ones, while preserving alpha coordinates):
$ convert source.png -channel RGB -negate target.png
See also the Myriad's automatic rules, which generate X-negated.png from X.png thanks to: make X-negated.png.
Rendering a Vector Image at a given Scale/Size
Let's suppose that a SVG file is available (for example obtained thanks to our latex-to-image.sh script).
Going for a PNG of a width of 1000 pixels while selecting a high-enough DPI, preserving the aspect ratio and keeping the background transparent:
$ convert -density 1200 -size 1000 -background none latex-formula.svg target.png
Setting a background to a solid color (e.g. white) may allow, when adding a border, to have its color applied only on that border (rather than on the full background).
Adding a Border to an Image
For example to add a 10-pixel wide / 5-pixel tall red border to an image:
$ magick source.png -bordercolor red -border 10x5 target.png
A more classical 2-pixel thick black border:
$ magick source.png -bordercolor black -border 2 target.png
Compositing/Blitting an Image onto Another
Let's suppose we have an overall, larger image (e.g. my-overall-plot.png) onto which we want to composite / blit a smaller one (e.g. my-formula.png) at position (100,150) - in pixels, relatively to the top-left corner - with no specific scaling:
$ magick composite my-formula.png my-overall-plot.png -geometry +100+150 target.png
Positioning the inner image based on "gravity" (preset areas, based on various possible origins; see magick -list gravity) is often convenient; for example relatively to the bottom-right corner of the final image (knowing that positive axes are then, for "SouthEast", the opposite of the default ones - positive coordinate offsets have therefore to be specified in order to go towards the center):
$ magick composite my-formula.png my-overall-plot.png -gravity SouthEast -geometry +50+200 target.png
Or simply to have the inner image centered into the overall one:
$ magick composite my-formula.png my-overall-plot.png -gravity Center target.png
See also our affix-images.sh script.
Plot Generation
Refer to our data display section.
UML Diagrams
If SysML can also be of interest, we focus here on UML2 class diagrams (one of the 14 types of diagrams provided by UML2).
Quick UML Cheat Sheet
Multiplicities
A multiplicity is a definition of cardinality (i.e. number of elements) of some collection of elements.
It can be set for attributes, operations, and associations in a class diagram, and for associations in a use case diagram. The multiplicity is an indication of how many objects may participate in the given relationship.
It is defined as an inclusive interval based on non-negative integers, with * denoting an unlimited upper bound (not, for example, n).
Most common multiplicities are:
- no instance or one instance: 0..1
- any number of instances, including zero: * (shorthand for 0..*)
- exactly k instances: k (so, if k=5, 5)
- at least M instances: M..* (2..*)
- at least M instances, but no more than N (hence bounds included): M..N (e.g. 3..5)
For associations, the default multiplicity is automatically is 0..1, while new attributes and operations have a default multiplicity of 1.
Association
An association is a relation between two classes (binary association) or more (N-ary association) that describes structural relationships between their instances.
For example a polygon may be defined from at least 3 vertices that it would reference, whereas a point may take part to any number of polygones (including none):
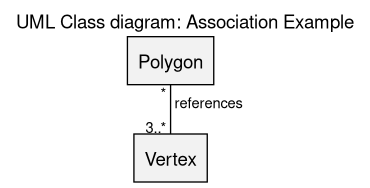
(see the sources of this diagram)
The multiplicity of an endpoint denotes the number of instances of the corresponding class that may take part to this association. For example, at least 3 points are needed to form a polygon, whereas any number of polygons can include a given point.
In UML the direction of the association is easily ambiguous (here we have to rely on external knwoledge to determine whether a polygon is composed of points, of if a point is composed of polygons). Adding a chevron (like > or <, e.g. "references >" ; ideally this should be a small solid triangle) to the text is not a good solution either, as the layout may place the respective endpoints in any relative position. Adding an arrow to the end of the line segment cannot be done either, as it would denote the navigability of the association instead.
Aggregation
An aggregation is a specific association that denotes that an instance of a class (e.g. Library) is to loosely contain instances of another class (e.g. Book), in the sense that the lifecycle of the contained classes is not strongly dependent on the one of the container (e.g. books will still exist even if the library is dismantled).
Here a library may contain any number of books (possibly none), and a given book belongs to at most one library.
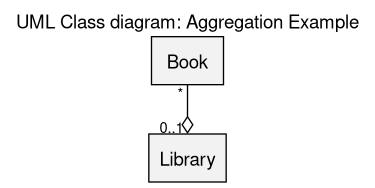
(see the sources of this diagram)
Composition
A composition is a specific association that denotes that an instance of a class (e.g. HumanBeing) is to own instances of another class (e.g. Leg), in the sense that the lifecycle of the contained classes fully depends on the one of the container (here, if a human being dies, his/her legs will not exist anymore either).
Here a human being has exactly 2 legs, and any given leg belongs to exactly one human being (therefore this model does not account for one-legged persons).
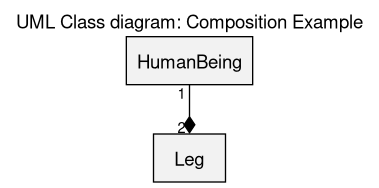
(see the sources of this diagram)
Inheritance
An inheritance relationship is a specific association that denotes that a class (e.g. HumanBeing) is a specific case of a more general one (e.g. Animal), and thus that an instance of the first one is also an instance of the second one ("is-a" relationship).
Here a human being is a specific animal.
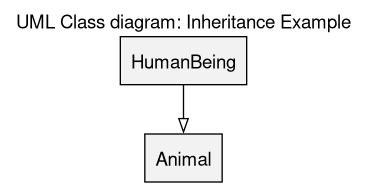
(see the sources of this diagram)
Tooling
In a design phase, one may prefer lightweight tools like Graphviz, PlantUML or even Dia.
As long as the architecture of a framework is not stabilised, having one's tool determine by itself the layout of the rendering (rather than having to place manually one's graphical components) is surely preferable.
For that we use Graphviz, with our own build conventions.
For example, supposing this diagram example, i.e. a source file named uml_class_diagram_example.graph:
$ make uml_class_diagram_example.png
# or, to force a regeneration and a displaying of the result:
$ make clean uml_class_diagram_example.png VIEW_GRAPH=true
This example results in the following diagram:
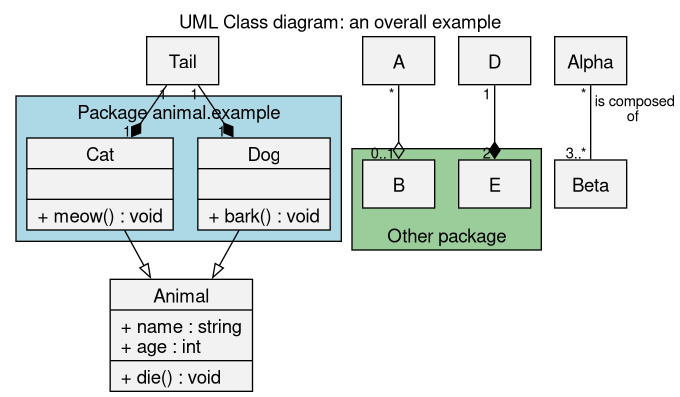
(see the sources of this diagram)
Finding Usable Content
Assets can be found thanks to Creative Commons, which references, among others, OpenClipart, otherwise possibly publicdomainvectors.org.
The simplest approach is to rely on SVG files, to edit them on Inkscape (select any subset of interest of the image), and possibly to export a selection of them as PNG files of the desired size (in the Export pane, enable the Export Selected only option and, in the Image Size tab, set the absolute width and/or height wanted).
In order to find the icons needed to devise a GUI from open elements, refer to the tremendously useful iconify.design website.
Using Additional Fonts
One may use websites like Dafont in order to select, based on appearance and licence, a given TTF font.
At least on Arch, it is sufficient to copy the corresponding downloaded TTF file (as root) in /usr/share/fonts/ so that tools like The Gimp support it right afterwards (e.g. no need to run fc-cache beforehand).
Language-specific Conventions
In French
Bullet lists are not supposed to start with a capital letter (see this link for more complete conventions).
In order to type specific characters on Windows, refer to this link; notably:
- À (a majuscule accent): Alt + 0192
- É (e majuscule accent aigu) =Alt + 0201
- È (e majuscule accent grave): Alt + 0200
- Ê (e majuscule accent circonflexe): Alt + 0202
See this section to do the same on Emacs.